Hello Community! 🤗
Not so long ago we announced the release of Locked Spaces, a new advanced security functionality that is an extension to our current Spaces model, and today, we’d like to take a closer look 🔎
What is Locked Spaces
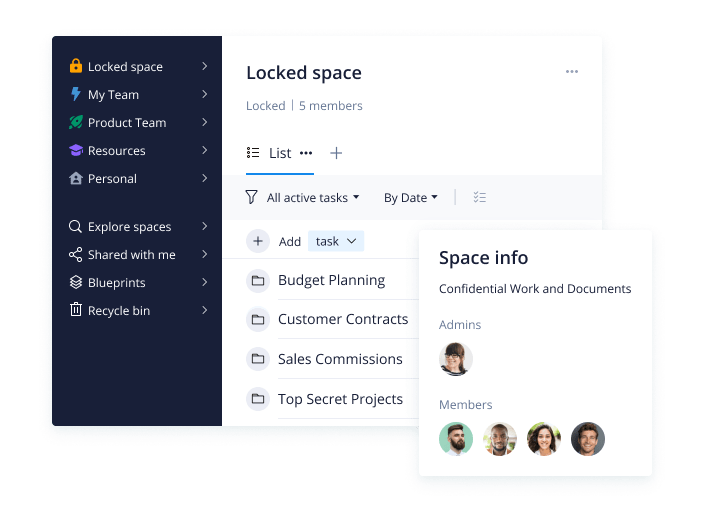
Locked Spaces is a new type of space that prevents any task, project, or folder - in short, any work-related information - from being shared with non-team members of the space 🔐
Spaces were first introduced back in 2019, and this new type of space helps teams leverage the existing building blocks of Wrike and create a new level of confidentiality within your organization.
Locked Spaces allows a higher level of data control where data is completely locked down and restricted only to a select group of team members. Additionally, Locked Spaces provides improved user access controls which is important in maintaining confidential information and ensuring that individuals aren’t able to share sensitive information with other users in the organization.
Check out this Help Center article which explains the difference between all types of Spaces - Personal, Public, Private, and Locked - in Wrike.
Please note that Locked Spaces are available on our Enterprise Pinnacle subscription.
When to Use Locked Spaces
Use Locked Spaces to hold private conversations about discrete projects, sensitive employee data, or financial and legal work with approved team members in a secure environment.
Main Benefits
Sharing data
By default data created in a Locked space is shared with space members and there is no way to share it with people outside of the space. Using selective sharing data can be unshared from users of the space.
Secure data
- When assigning, mentioning, or managing followers, users will only see members of the current Locked space
- When tagging and moving projects, tasks, and folders in a Locked space, users will only be able to see work items and locations within the current space
- Only folders from the current secure space are proposed when duplicating or creating recurring tasks
- When creating a blueprint from an item in a Locked space, it will not be possible to copy descriptions, attachments, assignees, or custom fields as part of the blueprint - this prevents the distribution of Locked space content
Tools in Locked Spaces
Dashboards, Reports, Calendars, Workload charts in a Locked space
- can’t be shared with people outside of a given Locked space
- can’t be moved or connected to another space
- can’t be built using data from outside of a given Locked space
For Admins
For Wrike Admins, Locked Spaces provides a new level of security and control to give them peace of mind, that eliminates the risk of leaking confidential information and ensuring only a specific group of individuals have the right access. Nothing can be shared outside of a Locked space. This means all tools, resources, conversations, and strategies can be kept secure, confidential, and private.
Joining a Locked space is only possible via an invite from the space admin with the account admin role. When members leave a Locked space, the admin has to take action as well, and all working data and space-level tools get unshared from these users.
For Regular Users
Team members that are part of a Locked space can only interact with users within that space. The ability to @mention and share to non-space members is prohibited and prevents the information from being shared with the wrong individuals and teams either intentionally or by accident.
Locked Space Management
Only space admins can manage space tools (Dashboards, Reports, Calendars, Workload charts), and space information. Any regular user can be assigned as an admin of a Locked space.
To manage space members and be able to delete a Locked space, space admins must also have an account admin role.
Please note that Space members can’t leave a Locked space on their own, they must be removed by a space admin.
How to Create a Locked Space
Only Wrike admins with the ability to create spaces can create Locked Spaces in their accounts.
Here’s how to do it:
- Click the + icon in the top right-hand corner of your workspace and select Space from the dropdown
- Enter a space name, and select Locked as the type of space
- Add members with the appropriate access level to your space
- Click Create
 How to Convert Spaces
It is also possible to convert a Locked space to a Public or Private space, and vice versa.
To convert any space:
- Navigate to the space you would like to convert
- Click the gear icon in the space page's top right-hand corner
- Select the new type of space, Private, Public, or Locked
- Click Save
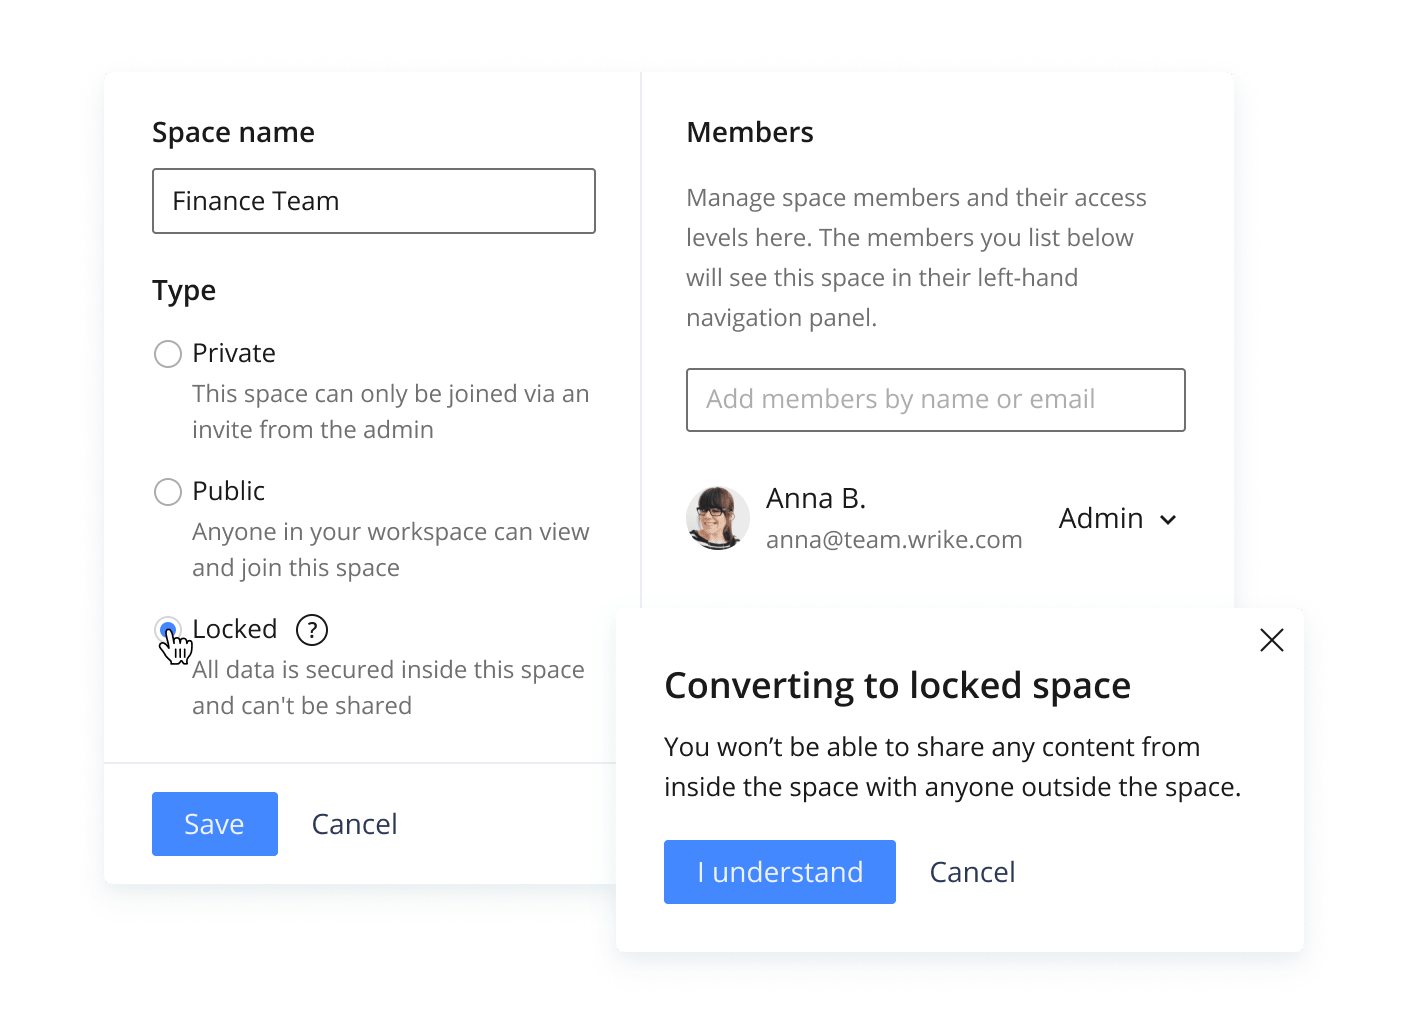
Note: If you are converting a Private or Public space into a Locked space, there may be conflicts that need to be resolved before the space conversion can take place. This can happen when:
- Items inside the space are shared with users who are not space members
- Tools inside the space have a data source that is outside of the space
- Items inside the space are also part of locations outside of the space
In this case, when you click Save to convert the space, a dialog box will appear asking you to solve relevant conflicts. Each conflict is displayed with a dropdown of options for solving the conflict. These will include inviting or removing users to/from the space, and removing items either from the space you are converting, or the other spaces they are located in.
To wrap it up, Locked Spaces are restricted, secure spaces for confidential collaboration such as company exec-level collaboration or extremely confidential projects collaboration.
We hope you’ve found this info useful. Any questions or feedback - make sure to let us know below 👇
P.S. Look out for the next post dedicated to Locked Spaces and more detailed use cases for leveraging this new type of space 👀